
Crossing realities tutorial
So, what’s up here?
This section is not a tutorial, but it contains useful information and tools I built as I explored VR.
Content
- Ghosthands: an Input Module for Oculus Touch in Unity
- Scene transition in Unity for VR: preserve head-tracking
Ghosthands: an Input Module for Oculus Touch in Unity

The story
When we started to port one of our games from Google Daydream to the Oculus Rift the first thing I thought was that I would really miss the Input Module I hacked together for the Daydream controller. I used this module for all the UI, and I found it reduced a lot the complexity of the code, as it allowed me to delegate a lot of the behaviour directly to the menu itself.
But my experience of hacking the Daydream Input Module was telling me that building that kind of thing would be really challenging. Hell, it might not even be possible at all for what I know! And yet, if it does work then it will save use a lot of time and troubles, so let’s try!
And there I went, diving so deep in Unity that I reached parts where there is no documentation anymore (and for Unity it means you have gone wayyyyy out of the beaten tracks). After a few hours of digging and testing I started to get a clearer picture of the monster hiding behind Unity’s abstraction layers. It was still unclear at that time if I could tame the beast, but I had gone to far to step back, so I went on. Going through Unity source code to better analyze my opponent I put together a strategy. Inheriting where I could and copy-pasting where I had to, refining at every new iteration, I slowly crafted my tools, preparing for the final assault. And there I went, surrounding the mighty creature with my interfaces, luring it with my classes. I got bitten a few times but slowly its resistance lowered, until we started to understand each other. Crafting our own words we managed to communicate, understand each other’s needs, and fulfil them. We made it, the magic happened.
But enough with the tales of my adventures, here is what you can do with this Input Module.
The uses
If you are familiar with Unity Event Triggers you know that you can use them to interact with GameObjects using your mouse. Google have created an Input Module to detect gazed based event for the Cardboard, which is pretty handy to create cool interactions :). And if you don’t know Event Triggers then you definitely have to watch this tutorial by Unity!
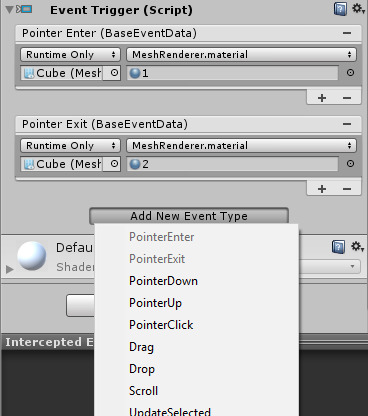
What Ghosthands does is giving you the same flexibility by offering you a range of events to listen to for the Oculus Touch controllers.
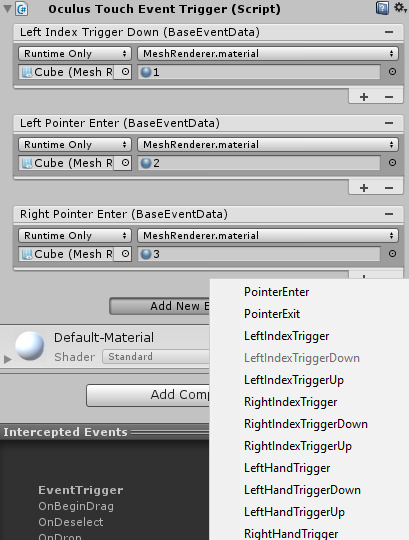
What it doesn’t do (yet) is send events to UI elements that don’t have a collider (but if you add a collider it will work fine).
The setup
You don’t have much to do to use this plugin, it’s the same setup as using Unity Event System:
- Get the Unity Package OculusTouchInputModule . unitypackage from our Github repository and import it in your project.
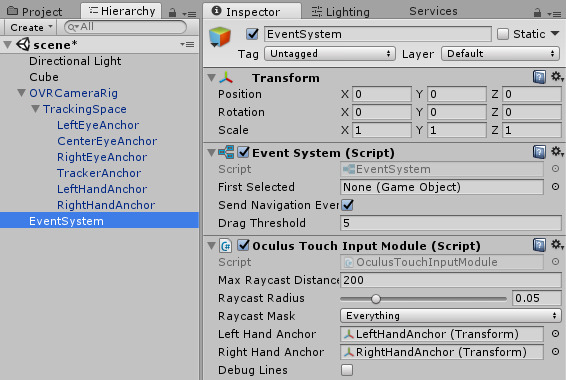
- Create an EventSystem GameObject in your Scene (
Create > UI > Event System), remove the Standalone Input Module component from it, add an Oculus Touch Input Module (Add Component > Event > Oculus Touch Input Module). - Drag and drop the LeftHandAnchor and RightHandAnchor GameObjects from your OVRCameraRig > TrackingSpace GameObject into the corresponding slots of the Oculus Touch Input Module.
- Go to any GameObject for which you want to register an event. Make sure that it has a collider (it works fine if it’s a trigger collider). Add an Oculus Touch Event Trigger component (
Add Component > Event > Oculus Touch Event Trigger). And use it as you would for a classic Event Trigger!
The bonus
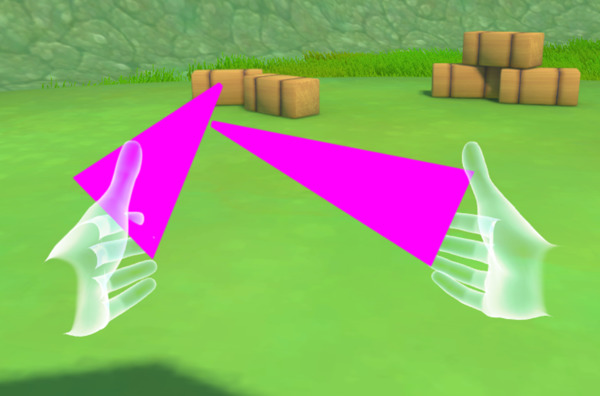
I added a handy Debug Lines option (check the box in the Oculus Touch Input Module) which traces a line from each controller in its forward direction, so you can see clearly where you are pointing at.
The parameters
In Oculus Touch Input Module:
- Max Raycast Distance: Objects farther than this from the controller will not be detected (in Unity units).
- Raycast Radius: Behind the scene the raycast is actually a Physics.SphereCast, which allows you to grab objects from afar without having to be exactly on them. Raycast Radius allows you to choose the width of the shperecast. Use 0 to raycast instead of shperecast. Note that this inherits the weaknesses of Unity spherecast: “SphereCast will not detect colliders for which the sphere overlaps the collider”. So don’t set it too big for small objects.
- Raycast Mask: Which Layers are used for detection.
- Left Hand Anchor: CF previously
- Right Hand Anchor: CF previously
- Debug Lines: CF previously
Here is a list of the events currently supported by the module:
- PointerEnter
- PointerExit
- LeftPointerEnter
- LeftPointerExit
- RightPointerEnter
- RightPointerExit
- LeftIndexTrigger
- LeftIndexTriggerDown
- LeftIndexTriggerUp
- RightIndexTrigger
- RightIndexTriggerDown
- RightIndexTriggerUp
- LeftHandTrigger
- LeftHandTriggerDown
- LeftHandTriggerUp
- RightHandTrigger
- RightHandTriggerDown
- RightHandTriggerUp
- AButton
- AButtonDown
- AButtonUp
- BButton
- BButtonDown
- BButtonUp
- XButton
- XButtonDown
- XButtonUp
- YButton
- YButtonDown
- YButtonUp
Scene transition in Unity for VR: preserve head-tracking

Scene transition in Unity can be tricky. If the new scene contains many objects it might take some time to load them all (call Awake on each script and draw all the meshes for the first time). This usually result in a freeze that will last until the new scene is loaded (even if you use LoadSceneAsync). In VR, this is particularly bad as users lose head-tracking when the freeze occurs, and this can happen quite quickly when targeting mobile VR (Daydream, GearVR…).
Our Daydream game Oz Chicken Slayer was removed from Daydream Playstore for a few days because of this (see here for more information), so I built a system based on fade out and fade in to remove the issue. Here I will focus on Daydream but this can be used for any VR platform (Oculus Rift, HTC Vive, GearVR…).
You can download the demo project on our Github: https://github.com/Tengio/unity-vr-scene-loader-demo
Let start by creating the fade effect, then when we use it for our transitions.
Fade effect

Before I was using OnGUI to draw a black rectangle across the whole screen, but with the new Unity 5.6 this doesn’t work anymore (as of 31/05/2017). The new technic involves drawing a GUI image right in front of the camera and playing with the alpha (transparency) to fade in and out.
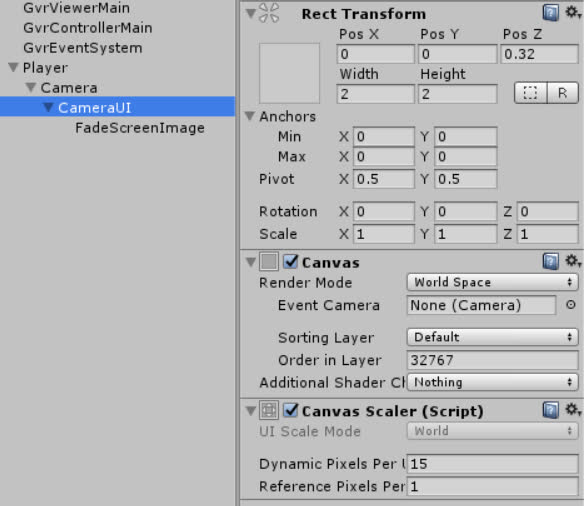
For this add a Canvas (Create > UI > Canvas) inside your Camera GameObject, set its Render Mode to World Space. Then scale it to be a 2 meters by 2 meters’ square and place it a few centimeters in front of the camera (play on the Z position).
Inside the Canvas add an Image (Create > UI > Image), scale it to fit entirely inside your canvas and change its color to whatever color you want for the fade (with alpha to 0).
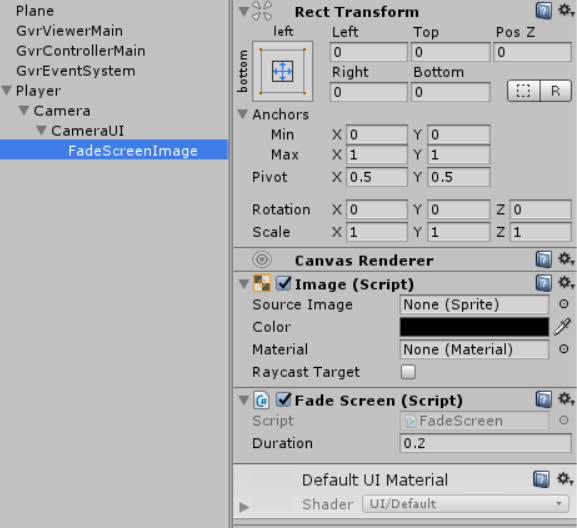
Then copy-paste the following code into a new C Sharp script (name it FadeScreen):
using System;
using System.Collections;
using UnityEngine;
using UnityEngine.UI;

namespace Tengio {
    [RequireComponent(typeof(Image))]
    public class FadeScreen : MonoBehaviour {

        [SerializeField]
        private float duration = 0.2F;

        private Image image;
        private Coroutine fadeOutCoroutine;
        private Coroutine fadeInCoroutine;


        private void Awake () {
            image = GetComponent<Image>();
        }

        public void FadeOut(Action callback = null) {
            CancelPendingFades();
            fadeOutCoroutine = StartCoroutine(FadeOutCoroutine(callback));
        }

        public void FadeIn(Action callback = null) {
            CancelPendingFades();
            fadeInCoroutine = StartCoroutine(FadeInCoroutine(callback));
        }

        private IEnumerator FadeInCoroutine(Action callback) {
            Color color = image.color;
            color.a = 1F;
            float startTime = Time.unscaledTime;
            while (Time.unscaledTime - startTime <= duration) {
                color.a -= Time.unscaledDeltaTime / duration;
                color.a = Mathf.Clamp01(color.a);
                image.color = color;
                yield return null;
            }
            color.a = 0F;
            image.color = color;
            if (callback != null) {
                callback();
            }
        }

        private IEnumerator FadeOutCoroutine(Action callback) {
            Color color = image.color;
            color.a = 0F;
            float startTime = Time.unscaledTime;
            while (Time.unscaledTime - startTime <= duration) {
                color.a += Time.unscaledDeltaTime / duration;
                color.a = Mathf.Clamp01(color.a);
                image.color = color;
                yield return null;
            }
            color.a = 1F;
            image.color = color;

            if (callback != null) {
                callback();
            }
        }

        private void CancelPendingFades() {
            if (fadeOutCoroutine != null) {
                StopCoroutine(fadeOutCoroutine);
            }
            if (fadeInCoroutine != null) {
                StopCoroutine(fadeInCoroutine);
            }
        }
    }
}
Drag and drop the script on your Image GameObject. Now you can call FadeOut() and FadeIn() at will!
If you want to test it right away add this to the script:
private void Update() {
    if(Input.GetKeyDown(KeyCode.O)) {
        FadeOut();
    }
    if (Input.GetKeyDown(KeyCode.I)) {
        FadeIn();
    }
}
Now you just have to press O to fade out and I to fade in!
Note 1: the Action callback = null allows you to register a callback, this way you can run some code when the Coroutine is done, this is very handy! If you don’t want to use it just ignore it :)
Note 2: the namespace Tengio part is to make sure that if another class called “FadeScreen” already exist in your code (either created by yourself or from a third party library) it will not enter in conflict with this one. But then if you create a script that uses this class you have to add using Tengio; (like the using UnityEngine; you have at the top of every scripts). You can rename it or remove it if you don’t want it. See Unity Manual for more information.
Scene loader
And now it’s time to put our screen fade to good use!
Copy-paste this in a new Script:
using System;
using System.Collections;
using UnityEngine;
using UnityEngine.SceneManagement;

namespace Tengio {
    public class SceneLoader : MonoBehaviour {

        [SerializeField]
        private FadeScreen fadeScreen;

        private bool sceneLoading;
        private Action callback;

        private void OnEnable() {
            SceneManager.activeSceneChanged += OnSceneLoaded;
        }

        private void OnDisable() {
            SceneManager.activeSceneChanged -= OnSceneLoaded;
        }

        public void LoadScene(int sceneIndex, Action callback = null, bool noFadeOut = false) {
            Scene scene = SceneManager.GetSceneByBuildIndex(sceneIndex);
            if (!scene.IsValid()) {
                Debug.LogError("Can't load scene: Invalid scene index = " + sceneIndex);
                return;
            }
            LoadScene(scene.name, callback, noFadeOut);
        }

        public void LoadScene(string sceneName, Action callback = null, bool noFadeOut = false) {
            if (!sceneLoading) {
                this.callback = callback;
                sceneLoading = true;
                if (noFadeOut) {
                    SceneManager.LoadScene(sceneName);
                } else {
                    fadeScreen.FadeOut(() => {
                        SceneManager.LoadScene(sceneName);
                    });
                }
            }
        }

        private void OnSceneLoaded(Scene unused, Scene unused2) {
            if (sceneLoading) {
                if (callback != null) {
                    callback();
                    callback = null;
                }
                StartCoroutine(WaitAndFadeIn());
            }
        }

        private IEnumerator WaitAndFadeIn() {
            // Wait a few frames to avoid freeze (caused by Awake calls?).
            yield return null;
            yield return null;
            yield return null;
            fadeScreen.FadeIn(() => {
                sceneLoading = false;
            });
        }
    }
}
Create a new GameObject (I’ll call it SceneLoader), add the script to it and drag your GameObject containing the FadeScreen on the right slot.
Note: I use Lambdas to take advantage of the callback of the FadeScreen class. The idea is that when fadeScreen.FadeIn() Coroutine is done the code between brackets will be executed:
fadeScreen.FadeIn(() => {
    sceneLoading = false; // This is executed when FadeIn() coroutine returns.
});
Now we need to make sure our SceneLoader and FadeScreen GameObjects are not destroyed when changing scene (that would be kind of stupid ^^‘). Create a new Script called “DontDestroyOnNewScene” and copy-paste this inside:
using UnityEngine;

namespace Tengio {
    public class DontDestroyOnNewScene : MonoBehaviour {

        public static DontDestroyOnNewScene Instance;

        void Awake() {
            if (Instance == null) {
                DontDestroyOnLoad(gameObject);
                Instance = this;
            } else if (Instance != this) {
                Destroy(gameObject);
            }
        }
    }
}
Create a new empty GameObject and add this script to it. Then move your SceneLoader and FadeScreen GameObjects inside it. Your GameObjects should now survive when you move from one scene to another!
And that’s it! You can call “LoadScene()” with the name or build index of your scene to load it nicely!

