Introduction
Google very recently released its own IOT platform: Android of Stuff! Wait… no… Android of… Thingy? No, I got it! Android Things! Yes, Android Things! And you can build cool things by putting stuff together with it! And the things can talk to each other and stuff! Anyway, it’s awesome!
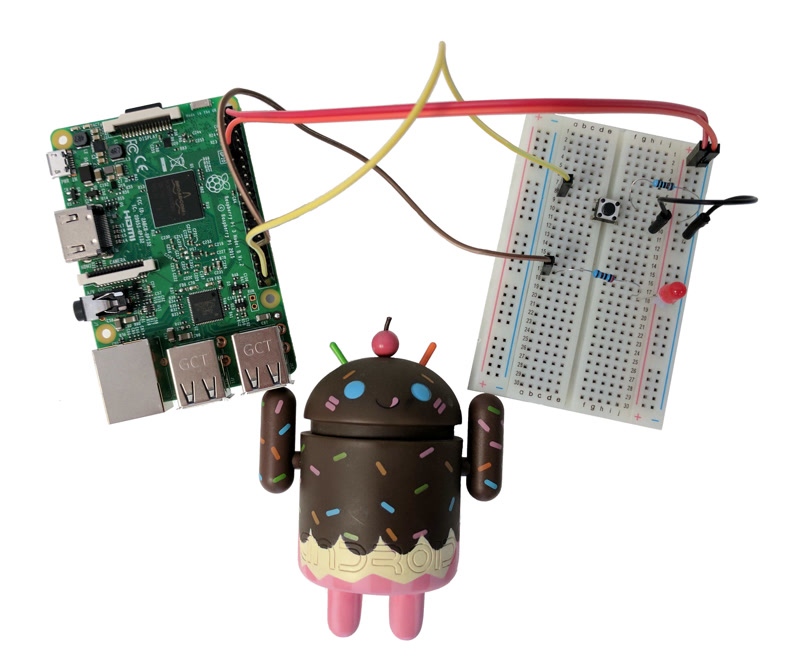
We got ourselves a kit to do some prototyping, basically a Raspberry Pi 3, a bunch of cables and a lot of cool sensors! We have temperature sensors, pressure sensors, light sensors and much more! And, of course, since we have all this cool stuff, for our first project with we will use… leds and buttons… only… Well, you have to start somewhere, right? ^^’
The platform is only 6 months old (as of June 2017) and it still has a lot of ground to cover, but it’s a pretty good start so far. You can use it with different hardware platforms. Once you manage to figure out how to compile your code it’s fairly simple to respond to button clicks and light leds up.
There are some good code samples on Android Things’ Github, best one to start is probably the “sample-button” project. I used this one and the doc here to build a fairy light triggered by a button press.
Get Started!
You will need 2 things before you start developing for Android Things:
- A hardware kit, Google proposes several options.
- Android Studio.
Also, make sure you have the correct version of the SDK (API 24 or higher) and tools (25.0.3 or higher) as stated on Android Things Doc here.
In this example I will be using the Raspberry Pi 3. You will have to flash your OS, you can find out how here. It took me about 10 minutes to flash the SD card. Also, the tool recommended in the doc, Etcher, did not work for me on Windows, so I used Win32DiskImager instead as described here.
Now let’s compile and install our first project!
Raspberry, Raspberry, do you read?
We will start with an empty project to test compilation and app installation alone.
Get the template from the Github repo. Open it in Android Studio (you can upgrade it if prompted to) and navigate to the MainActivity class. You should have this:
public class MainActivity extends Activity {
    private static final String TAG = MainActivity.class.getSimpleName();

    @Override
    protected void onCreate(Bundle savedInstanceState) {
        super.onCreate(savedInstanceState);
        Log.d(TAG, "onCreate");
    }

    @Override
    protected void onDestroy() {
        super.onDestroy();
        Log.d(TAG, "onDestroy");
    }
}
Next you have to connect to your Raspberry (to deploy your code on it). See how to do this here.
You can now compile and install it on your Raspberry. I’m a command line person so I use the provided command lines to do this:
./gradlew installDebug
adb shell am start com.example.androidthings.myproject/.MainActivity
If you get an error check here where I list some of the issues I encountered.
You should see a white screen with the name of your app at the top (My Android Things app) on your Raspberry screen. Now let’s check the logs to see if we are actually doing anything!
In a new terminal run:
adb logcat -s MainActivity
Restart your app with:
adb shell am start com.example.androidthings.myproject/.MainActivity
And you should see:
D MainActivity: onCreate
Victory!
Now to phase 2: One button and one led!
Twinkle Twinkle little led
Then let’s see the basic schema, we will start with the one of the “sample-button” project.
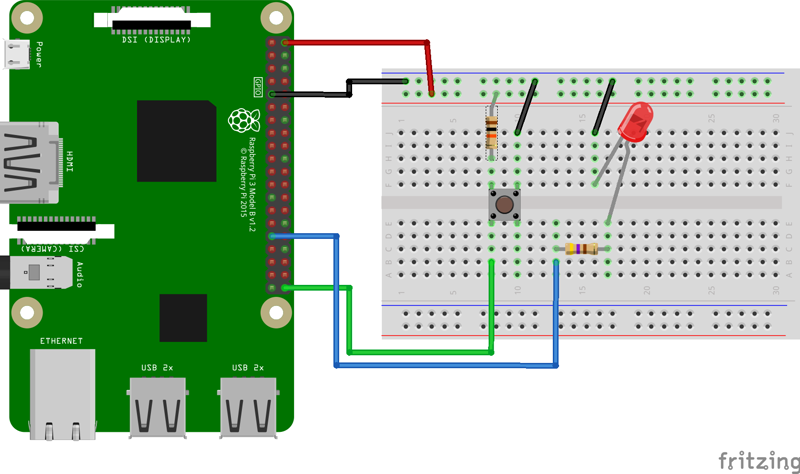
Once you are done with the cables go back in Android Studio and create a new Java class called “OneButtonOneLed” in the same folder as the “MainActivity”. Copy-paste the following code inside:
package com.example.androidthings.myproject;

import android.app.Activity;
import android.os.Bundle;
import android.util.Log;

import com.google.android.things.pio.Gpio;
import com.google.android.things.pio.GpioCallback;
import com.google.android.things.pio.PeripheralManagerService;

import java.io.IOException;


public class OneButtonOneLed extends Activity {

    private static final String TAG = OneButtonOneLed.class.getSimpleName();
    private static final String BUTTON_PIN = "BCM21";
    private static final String LED_RED_PIN = "BCM6";

    private Gpio button;
    private Gpio ledRed;

    private GpioCallback buttonCallback = new GpioCallback() {
        @Override
        public boolean onGpioEdge(Gpio gpio) {
            Log.d(TAG, "GPIO changed, button pressed");
            try {
                ledRed.setValue(!gpio.getValue());
            } catch (IOException e) {
                logError(e);
            }
            // Return true to keep callback active.
            return true;
        }
    };

    @Override
    protected void onCreate(Bundle savedInstanceState) {
        super.onCreate(savedInstanceState);

        PeripheralManagerService service = new PeripheralManagerService();
        try {
            button = service.openGpio(BUTTON_PIN);
            button.setDirection(Gpio.DIRECTION_IN);
            button.setEdgeTriggerType(Gpio.EDGE_BOTH); // We want to detect both when the button goes down and when it goes up.
            button.registerGpioCallback(buttonCallback);

            ledRed = service.openGpio(LED_RED_PIN);
            ledRed.setDirection(Gpio.DIRECTION_OUT_INITIALLY_LOW);
            ledRed.setValue(false);
        } catch (IOException e) {
            logError(e);
        }
    }

    @Override
    protected void onDestroy() {
        super.onDestroy();
        if (button != null) {
            button.unregisterGpioCallback(buttonCallback);
            try {
                button.close();
            } catch (IOException e) {
                logError(e);
            }
        }

        if (ledRed != null) {
            try {
                ledRed.close();
            } catch (IOException e) {
                logError(e);
            }
        }
    }

    private void logError(IOException e) {
        Log.e(TAG, "Error on PeripheralIO API", e);
    }
}
Now open “AndroidManifest.xml” and change
<activity android:name=".MainActivity">
to
<activity android:name=".OneButtonOneLed">
This will allow us to compile and install the new activity from command line with:
./gradlew installDebug
adb shell am start com.example.androidthings.myproject/.OneButtonOneLed
If we analyse the code, the interesting parts are as follows:
Declare pins position on the Raspberry with:
    private static final String BUTTON_PIN = "BCM21";
    private static final String LED_RED_PIN = "BCM6";
You can find the name and role of each pin here. Here is a copy:
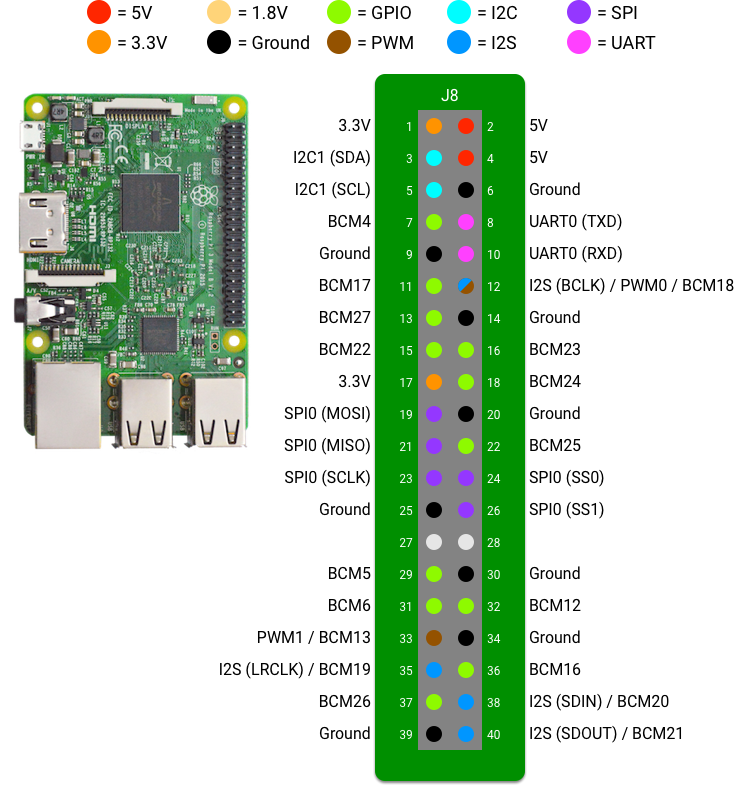
Tell what each pin is supposed to do in
onCreate:// Set what's the corresponding pin on the Raspberry. button = service.openGpio(BUTTON_PIN); // We want to the button to send a signal to the Raspberry (as opposed to the Raspberry sending a signal with DIRECTION_OUT). button.setDirection(Gpio.DIRECTION_IN); // We want to detect both when the button goes down and when it goes up. button.setEdgeTriggerType(Gpio.EDGE_BOTH); // Register a callback to do things when the button is pressed. button.registerGpioCallback(buttonCallback);Know when the button is pressed and do some actions with a callback:
GpioCallback buttonCallbackDon’t forget to clean the input/output in
onDestroy.
We got this button under control, let’s add more leds!
Getting serious
Here is the new schema:
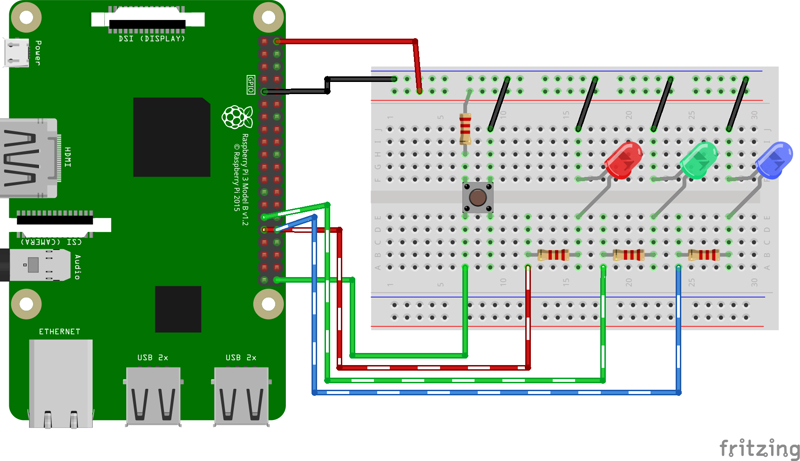
Like before, create a new Java class and copy-paste this code :
package com.example.androidthings.myproject;

import android.app.Activity;
import android.os.Bundle;
import android.os.Handler;
import android.util.Log;

import com.google.android.things.pio.Gpio;
import com.google.android.things.pio.GpioCallback;
import com.google.android.things.pio.PeripheralManagerService;

import java.io.IOException;


public class FairyLight extends Activity {

    private static final String TAG = FairyLight.class.getSimpleName();
    private static final int INTERVAL_BETWEEN_BLINKS = 300; // In milliseconds.
    private static final int LEDS_COUNT = 3;
    private static final String BUTTON_PIN = "BCM21";
    private static final String LED_RED_PIN = "BCM6";
    private static final String LED_GREEN_PIN = "BCM5";
    private static final String LED_BLUE_PIN = "BCM12";

    private Gpio button;
    private Gpio[] leds = new Gpio[LEDS_COUNT];

    private volatile boolean blinking = false;

    private GpioCallback buttonCallback = new GpioCallback() {
        @Override
        public boolean onGpioEdge(Gpio gpio) {
            blinking = !blinking;
            if (blinking) {
                startBlink();
            } else {
                stopBlink();
            }
            return true;
        }
    };

    private void startBlink() {
        new Thread(new Runnable() {
            @Override
            public void run() {
                while (blinking) {
                    for (Gpio led : leds) {
                        if (blinking) {
                            try {
                                led.setValue(true);
                                Thread.sleep(INTERVAL_BETWEEN_BLINKS);
                                led.setValue(false);
                            } catch (IOException | InterruptedException e) {
                                e.printStackTrace();
                            }
                        }
                    }
                }
            }
        }).start();
    }

    private void stopBlink() {
        for (Gpio led : leds) {
            if (led != null) {
                try {
                    led.setValue(false);
                } catch (IOException e) {
                    e.printStackTrace();
                }
            }
        }
    }

    @Override
    protected void onCreate(Bundle savedInstanceState) {
        super.onCreate(savedInstanceState);

        PeripheralManagerService service = new PeripheralManagerService();
        try {
            button = service.openGpio(BUTTON_PIN);
            button.setDirection(Gpio.DIRECTION_IN);
            button.setEdgeTriggerType(Gpio.EDGE_FALLING);
            button.registerGpioCallback(buttonCallback);

            leds[0] = service.openGpio(LED_RED_PIN);
            leds[1] = service.openGpio(LED_GREEN_PIN);
            leds[2] = service.openGpio(LED_BLUE_PIN);
            for (Gpio led : leds) {
                led.setDirection(Gpio.DIRECTION_OUT_INITIALLY_LOW);
            }
        } catch (IOException e) {
            logError(e);
        }
    }

    @Override
    protected void onDestroy() {
        super.onDestroy();

        if (button != null) {
            button.unregisterGpioCallback(buttonCallback);
            try {
                button.close();
            } catch (IOException e) {
                logError(e);
            }
        }

        for (Gpio led : leds) {
            if (led != null) {
                try {
                    led.close();
                } catch (IOException e) {
                    logError(e);
                }
            }
        }
    }

    private void logError(IOException e) {
        Log.e(TAG, "Error on PeripheralIO API", e);
    }
}
This is pretty much the same code as before, but this time we have 3 leds instead of one, the button trigger on EDGE_FALLING and we use a Thread to blink.
Like previously, open “AndroidManifest.xml” and change the name of the activity, then compile and install (using the right activity name), you should know how to do this by now ;)
One last for the road
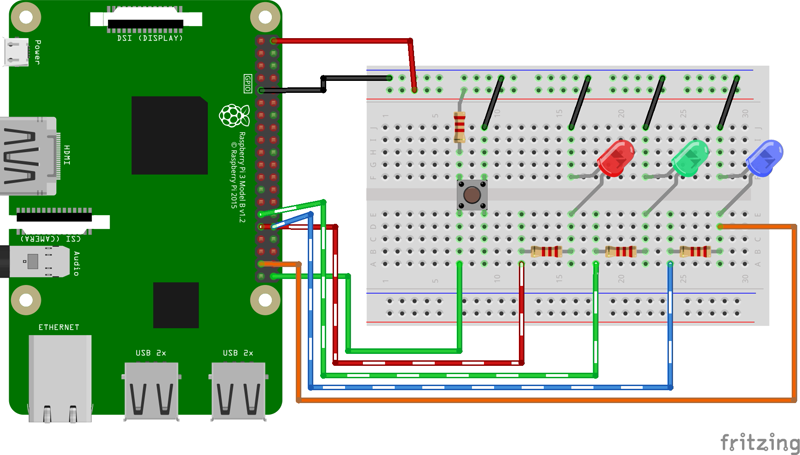
Here is a small variation on the previous design where we replace the while loop by an input from the board (feedback loop).
package com.example.androidthings.myproject;

import android.app.Activity;
import android.os.Bundle;
import android.util.Log;

import com.google.android.things.pio.Gpio;
import com.google.android.things.pio.GpioCallback;
import com.google.android.things.pio.PeripheralManagerService;

import java.io.IOException;


public class FairyLightChained extends Activity {

    private static final String TAG = FairyLightChained.class.getSimpleName();
    private static final int INTERVAL_BETWEEN_BLINKS = 300; // In milli seconds.
    private static final int LEDS_COUNT = 3;
    private static final String BUTTON_PIN = "BCM21";
    private static final String LED_IN_PIN = "BCM26";
    private static final String LED_RED_PIN = "BCM6";
    private static final String LED_GREEN_PIN = "BCM5";
    private static final String LED_BLUE_PIN = "BCM12";

    private Gpio button;
    private Gpio ledIn;
    private Gpio[] leds = new Gpio[LEDS_COUNT];

    private volatile boolean blinking = false;


    private GpioCallback buttonCallback = new GpioCallback() {
        @Override
        public boolean onGpioEdge(Gpio gpio) {
            blinking = !blinking;
            if (blinking) {
                startBlink();
            } else {
                stopBlink();
            }
            return true;
        }
    };

    private GpioCallback ledInCallback = new GpioCallback() {
        @Override
        public boolean onGpioEdge(Gpio gpio) {
            if (blinking) {
                startBlink();
            }
            return true;
        }
    };

    private void startBlink() {
        new Thread(new Runnable() {
            @Override
            public void run() {
                for (Gpio led : leds) {
                    if (blinking) {
                        try {
                            led.setValue(true);
                            Thread.sleep(INTERVAL_BETWEEN_BLINKS);
                            led.setValue(false);
                        } catch (IOException | InterruptedException e) {
                            e.printStackTrace();
                        }
                    }
                }
            }
        }).start();
    }

    private void stopBlink() {
        for (Gpio led : leds) {
            if (led != null) {
                try {
                    led.setValue(false);
                } catch (IOException e) {
                    e.printStackTrace();
                }
            }
        }
    }

    @Override
    protected void onCreate(Bundle savedInstanceState) {
        super.onCreate(savedInstanceState);

        PeripheralManagerService service = new PeripheralManagerService();
        try {
            button = service.openGpio(BUTTON_PIN);
            button.setDirection(Gpio.DIRECTION_IN);
            button.setEdgeTriggerType(Gpio.EDGE_FALLING);
            button.registerGpioCallback(buttonCallback);

            ledIn = service.openGpio(LED_IN_PIN);
            ledIn.setDirection(Gpio.DIRECTION_IN);
            ledIn.setEdgeTriggerType(Gpio.EDGE_FALLING);
            ledIn.registerGpioCallback(ledInCallback);

            leds[0] = service.openGpio(LED_RED_PIN);
            leds[1] = service.openGpio(LED_GREEN_PIN);
            leds[2] = service.openGpio(LED_BLUE_PIN);
            for (Gpio led : leds) {
                led.setDirection(Gpio.DIRECTION_OUT_INITIALLY_LOW);
            }
        } catch (IOException e) {
            logError(e);
        }
    }

    @Override
    protected void onDestroy() {
        super.onDestroy();

        if (button != null) {
            button.unregisterGpioCallback(buttonCallback);
            try {
                button.close();
            } catch (IOException e) {
                logError(e);
            }
        }

        if (ledIn != null) {
            ledIn.unregisterGpioCallback(ledInCallback);
            try {
                ledIn.close();
            } catch (IOException e) {
                logError(e);
            }
        }

        for (Gpio led : leds) {
            if (led != null) {
                try {
                    led.close();
                } catch (IOException e) {
                    logError(e);
                }
            }
        }
    }

    private void logError(IOException e) {
        Log.e(TAG, "Error on PeripheralIO API", e);
    }
}
What happens here?
- We add a new input (like the button) that detects when the electric tension goes from up to down in
onCreate. - When we detect the electric tension goes from up to down on the last led (the blue one) we send a signal to restart the blinking with the
ledInCallback. - And we enter a loop of infinite feedback! Until someone presses the button again…
Conclusion
It was fairly simple to interact with the buttons and leds, next step would be to build a dozen of those fairy lights and strap them to one of your coworkers to pretend he is a cool robot! Or better, connect all those devices through Google Cloud IOT services and build a cloud of sentient fairy lights! Or simply try other sensors ^^

Useful Info
Here is a collection of useful tips and bug fixes I found along the way.
How to restart or turn off your device
According to Devunwired on this Stackoverflow thread you can safely unplug-replug your Raspberry to restart it. Or you can restart it through adb: adb shell reboot (and adb shell reboot -p to turn it off).
Connect to the Pi? A piece of cake!
To connect to the Raspberry make sure your dev computer is on the same network as the Raspberry. Then you need to get the Raspberry IP to connect to it. Normally “Raspberry Pi broadcasts the hostname Android.local over Multicast DNS”. But don’t worry if it doesn’t work, there are other ways to get it.
You will use Android Debug Bridge in command line with the command adb connect <device-ip> to connect to the Raspberry. Try this first:
adb connect Android.local
If it works fantastic, if it “cannot resolve host ‘Android.local’” then you need to get the real IP.
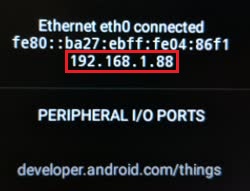
Get Raspberry IP from splash screen
When you power up your Raspberry it should land on a page (after the loading page) where the IP is written at the bottom.
Note: Make sure you plug the HDMI cable before you power up the Raspberry, else you will have to restart it.
Get Raspberry IP from IP scan
Now if you had an app already installed on your device and configured to run at startup (which is the case by default in the sample code provided by Google) you will not see the previous screen. It happened to me and what I did to fix this is running an IP scan to get all the active IPs on the network. There where only three: my computer, the router and the Raspberry, so it was easy to guess the right one (it might not be so easy depending on your network). You can get the bash script to scan IPs here. Replace 10.1.1 in the script with the beginning of your computer IP (you can get it with ifconfig on UNIX or ipconfig on Windows). For example, mine was 192.168.1.104 so I replaced 10.1.1.{1..255} by 192.168.1.{1..255}.
Note: I’m using Cygwin (through Github’s Git Bash for Windows) and I had to run this script as administrator. To do this right click on Git Bash icon and select Run as administrator, this terminal will have admin access. Then launch the script as usual through the terminal.
Issues I encountered with ADB.
No connected devices!
* What went wrong:
Execution failed for task ':app:installDebug'.
> com.android.builder.testing.api.DeviceException: No connected devices!
This likely means that you didn’t connect to the device, so run adb connect <device-ip> and check if the connection succeed with adb devices. You should see your device IP like this:
$ adb devices
List of devices attached
192.168.1.88:5555       device
No online devices found.
If you get:
* What went wrong:
Execution failed for task ':app:installDebug'.
> com.android.builder.testing.api.DeviceException: No online devices found.
and a few lines above:
Skipping device '192.168.1.88:5555' (192.168.1.88:5555): Device is OFFLINE.
then run adb devices and you should get:
$ adb devices
List of devices attached
192.168.1.88:5555       offline
The offline word means that even if you are connected to the device, it’s considered as “offline” and you cannot issue commands to it.
To fix this restart your Raspberry by unpluging-repluging the power cord and run the following command to restart adb server:
adb kill-server
adb start-server
And connect to the device again:
adb connect <device-ip>
adb devices
Your device should not appear offline anymore!
Failed to finalize session.
* What went wrong:
Execution failed for task ':app:installDebug'.
> com.android.builder.testing.api.DeviceException: com.android.ddmlib.InstallException: Failed to finalize session : INSTALL_FAILED_MISSING_SHARED_LIBRARY: Package couldn't be installed in /data/app/com.example.androidthings.myproject-1: Package com.example.androidthings.myproject requires unavailable shared library com.google.android.things; failing!
This one was simple, I had my phone connected to my computer, so ADB was trying to build on my phone instead of the Raspberry…
Buttons or leds not working
If you have several app installed and running at the same time they may conflict with the different inputs. You can see in the log the following error:
I ButtonActivity: Configuring GPIO pins
I peripheralman: [0612/121711:INFO:pio_errors.cc(136)] BCM6 is already in use by PID 2367
E ButtonActivity: Error configuring GPIO pins
E ButtonActivity: com.google.android.things.pio.PioException: android.os.ServiceSpecificException: BCM6 is already in use
You either have to stop your unused apps or uninstall them. To see what apps are installed list the installed packages with:
adb shell pm list packages -3
then either uninstall:
adb uninstall <package-name>
or stop the app:
adb shell am force-stop <package-name>
