Crossing realities tutorial
Create your environment
First create a new project (File > New Project) with any name you fancy and with 3D checked. Then load the GoogleVRForUnity package (Assets > Import Package > Custom Package) and select everything but the DemoScene folder.
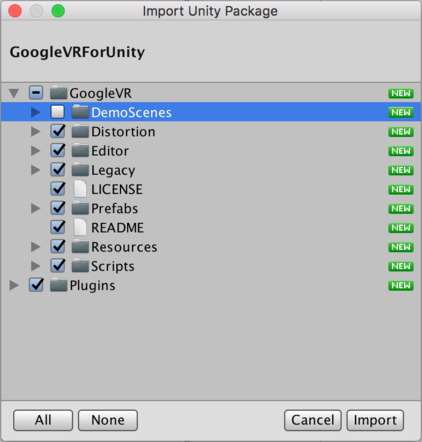
Now go to GoogleVR > Prefabs folder and drag and drop the GvrViewerMain prefab to your scene. This element will handle a lot of things for you (until cardboard becomes native in Unity and we don’t need it anymore :) ).
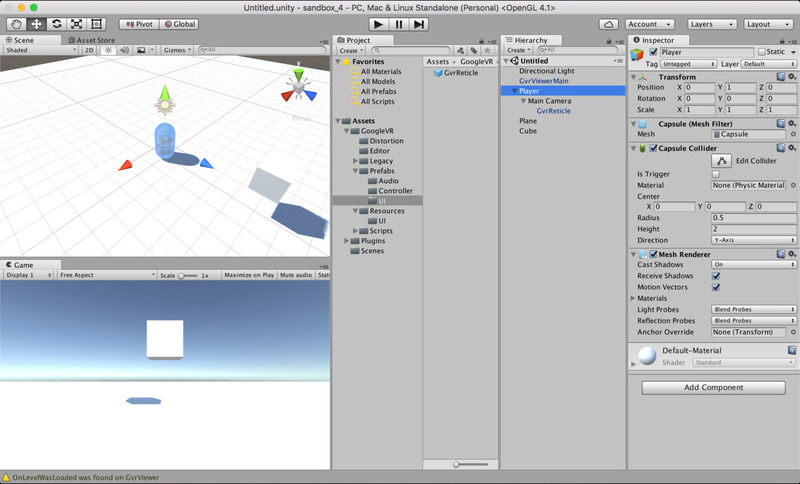
Let’s create our player. On the Hierarchy tab click Create > 3D Object > Capsule. Rename your capsule Player and drag and drop the Main Camera object that was automatically created for you by Unity into your Player. Now got to GoogleVR > Prefabs > UI and drag and drop the GvrReticle prefab inside the Main Camera. Then add a Physics Raycaster to your Main Camera by selecting it, clicking Add Component in the Inspector tab and typing “Raycaster” in the search field. Your hierarchy should look like this by now:
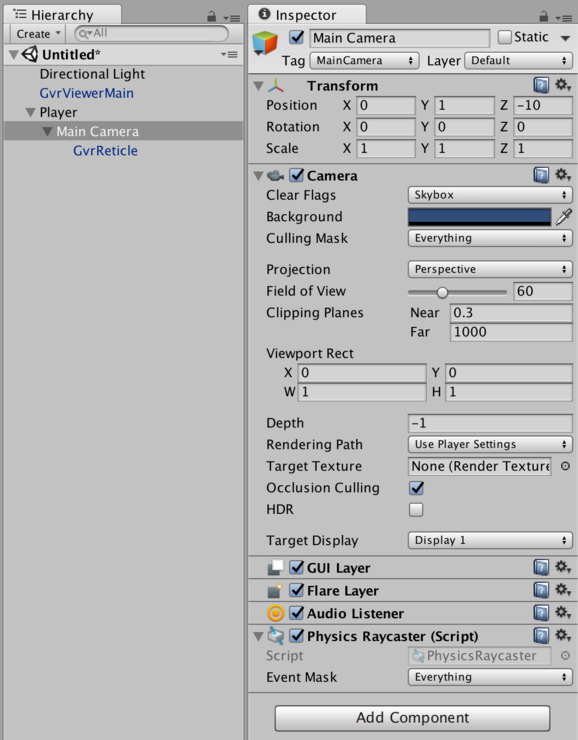
We can see that the Main Camera object is not centered properly inside the Player (by looking at the Transform Position). It’s common that objects get placed at unwanted positions when created. To reset the position to the origin click on the small cog on the top right corner of the Transform component and click Reset Position. Or you can do it manually by setting X, Y and Z to zero.
The camera represents your eyes in VR, so for increased realism you can place the camera at the top of the capsule by increasing it’s Y to 1. Keep in mind that 1 unit in Unity should represent one meter in real life, so by having the Player Y at 1 And the Main Camera Y at 1 you will be 2 meters tall in VR.
Now if we click Play we can simulate head movement by holding the “alt” key and moving the mouse. There is also a reticle in the center of our view. But we cannot move yet, and there is nowhere to move anyway.
Let’s add a floor to move on and an object to move to. Create a plane at the root of your hierarchy (Create > 3D Object > Plane) and increase it’s scale to (5, 5, 5). Now create a cube in the same way and move it somewhere near your Player, like (0, 2, 5). Move your player out of the floor by increasing its Y position to 1. You should have something like this now:
Create a folder called Scenes in your Asset folder and save your scene in it (File > Save Scene).
And now that we have our environment set up we can start moving! One thing you need to keep in mind when working with a Cardboard is that you only have one button, so all your in-game interactions must be done with this single button (until Google release the Daydream controller :D).
Stand up and walk!
We have several options to move around, each one having advantages and disadvantages, so it really depends on what kind of movement you want to achieve. I will describe 4 options here, the first 2 being the most generic ones that should perform well in most situations. The two last might be better in some very special cases. It’s up to you to see the one that fits best in your situation:
- Rigidbody: Player is subject to gravity.
- Character Controller: Player is NOT subject to gravity.
- Rigidbody with drag and no gravity: Designed for a game in space.
- Nav Mesh Agent: Use paths to find quickest trajectory to destination.
Rigidbody
This type of movement is physics-based, so you are subject to gravity and can fall, which makes it realistic. You will be able to move in the direction you are facing by holding the left mouse button or holding the trigger of the Cardboard.
First add a Rigidbody to the Player (Add Component button in the Inspector tab and type Rigidbody). Then create a folder called Scripts in your Assets folder and create a new script in it (right click on the folder and Create > C# Script) called “PlayerMotorRigidbody”. Open the script (double click on it) and copy-paste the following code (replace all the auto-generated code):
using UnityEngine;

[RequireComponent(typeof(Rigidbody))]
public class PlayerMotorRigidbody : MonoBehaviour
{
    /*
     * When trigger is down moves in the direction facing the main camera.
     */

    [SerializeField]
    private float speed = 3f;

    private Rigidbody rb;

    void Awake()
    {
        rb = GetComponent<Rigidbody>();
        rb.freezeRotation = true;
    }

    void FixedUpdate()
    {
        if (Input.GetButton("Fire1"))
        {
            Move();
        }
    }

    void Move()
    {
        Vector3 direction = Camera.main.transform.forward;
        direction.y = 0f; // Prevent unwanted jumping when looking up.

        Vector3 movement = direction * speed * Time.deltaTime;

        // Move the player to it's current position plus the movement.
        rb.MovePosition(transform.position + movement);
    }
}
Here is a quick explanation of the key parts of this code:
rb.freezeRotation = true;=> Prevent all rotation of the Player, so it doesn’t topple.FixedUpdateinstead ofUpdate=> Because we are dealing with a Rigidbody (see Unity Doc).Input.GetButton("Fire1")=> Detect when the Cardboard trigger is down (or mouse left click).
Note: [RequireComponent(typeof(Rigidbody))] is here to make sure that the game object you attach this script to has a Rigidbody component. If it doesn’t then one will be created automatically. And Unity will prevent you from removing it by mistake. This is quite handy :)
Drag and drop the script on the Player. Now you can click to move in the direction you are facing! (when the game is running in the editor, you can look around by holding “alt”). You can test it on your Cardboard, just do the same build steps that you did for the demo scene.
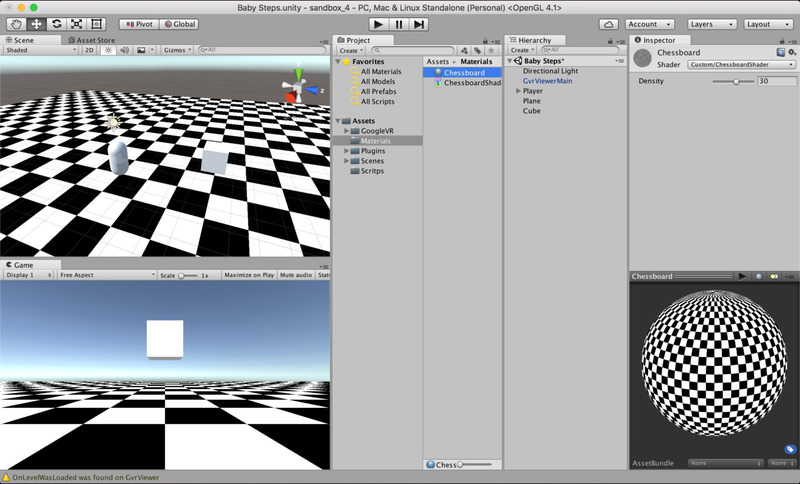
When moving around you may notice that it’s sometimes hard to see if you are actually moving or not, especially if you can’t see the cube. To fix that I often draw a chessboard pattern on the plane using a Material with a custom Shader. See how to do that at the bottom of the article.
Character Controller
Here we use a Character Controller, it’s a component Unity created for Doom like movement. It’s not subject to gravity nor forces and you can set parameters to choose what’s the max slope the Player can climb or what’s the max height of the objects he can step onto. It can be better than the Rigidbody variant depending on what you want to achieve.
Create a new script called “PlayerMotorCharacterController” and copy-paste the following inside:
using UnityEngine;

[RequireComponent(typeof(CharacterController))]
public class PlayerMotorCharacterController : MonoBehaviour
{
    /*
     * When trigger is down moves in the direction facing the main camera.
     */

    [SerializeField]
    private float speed = 3.0f;

    private CharacterController controller;

    void Awake()
    {
        this.controller = GetComponent<CharacterController>();
    }

    void Update()
    {
        if (Input.GetButton("Fire1"))
        {
            controller.SimpleMove(Camera.main.transform.forward * speed);
        }
    }
}
Nothing out of the ordinary with this script, its pretty straightforward. Just drag and drop it on your Player and it should create the Character Controller for you. Don’t forget to remove any other “PlayerMotor” script from the Player if there are any.
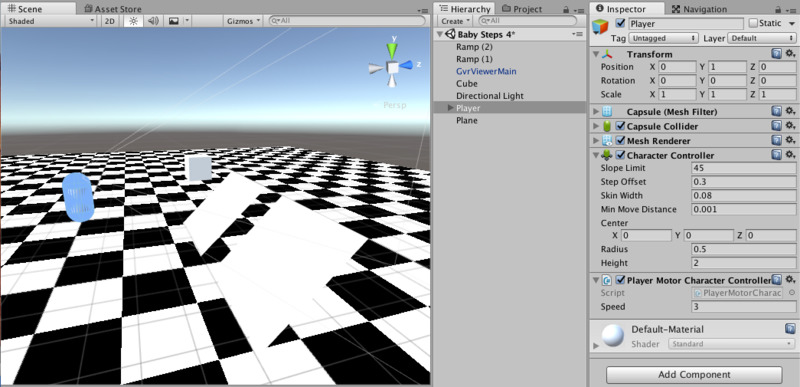
To test how the Character Controller reacts to slopes create a new Plane and call it “Ramp (1)”. Set its Position to (3, 1, 5), Rotation to (316, 0, 0) and Scale to (0.3, 1, 0,3). Now duplicate it (right click Duplicate) and change the new ramp Position to (7, 1, 5) and Rotation to (315, 0, 0). Hit Play and try to climb each ramp. You can climb the first one because the slope is 44 but you can’t climb the second one because your Character Controller Slope Limit is 45. If you “jump” from the ramp you can see that the Player is not subject to gravity. When you move in any direction it will also move toward the ground, but if you stop moving mid-air it will just stay here floating.
Rigidbody with drag and no gravity
This type of movement is also physics-based but this time gravity is disabled so you will float like in space. It uses the drag component of the Rigidbody to decelerate and limit max speed. Same controls as previously, hold the left mouse button or the trigger to move in the direction you are facing, you can also move to the sky. The player will accelerate and decelerate progressively (not like the previous one where you were always moving at the same speed and stopping right away when releasing the trigger). I designed this type of movement for a game in space where the player was moving with a Manned Maneuvering Unit (kind of a space jetpack).

Like previously, create a new script in the Scripts folder called “PlayerMotorDrag” and replace the auto-generated code with this one:
using UnityEngine;

[RequireComponent(typeof(Rigidbody))]
public class PlayerMotorDrag: MonoBehaviour
{
  /*
   * When trigger is down moves in the direction facing the main camera.
   * Accelerate and decelerate progressively with max speed capped by drag.
   */

    [SerializeField]
    private float acceleration = 8f;
    [SerializeField]
    [Tooltip("Increase to reduce max speed.")]
    private float movementDrag = 1f;
    [SerializeField]
    [Tooltip("Increase to increase brake speed.")]
    private float decelerationDrag = 1.5f;

    private Rigidbody rb;
    private bool triggerDown;

    void Awake()
    {
        rb = GetComponent<Rigidbody>();
        rb.useGravity = false;
        rb.freezeRotation = true;
        triggerDown = false;
    }

    void FixedUpdate()
    {
        if (Input.GetButtonDown("Fire1"))
        {
            rb.drag = movementDrag;
            triggerDown = true;
        }

        if (Input.GetButtonUp("Fire1"))
        {
            triggerDown = false;
            rb.drag = decelerationDrag;
        }

        if (triggerDown)
        {
            rb.AddForce(Camera.main.transform.forward * acceleration);
        }
    }
}
The key parts of this code are:
rb.useGravity = false;=> Disable gravity for the player.rb.drag = movementDrag;=> Set the drag value when moving, which limit the max speed.rb.drag = decelerationDrag;=> Set the drag value when not moving, which modify the brake speed.rb.AddForce(Camera.main.transform.forward * acceleration);=> move in the direction you are facing by applying a force to the Rigidbody.
Drag and drop this script on the Player and remove the old PlayerMotorRigidbody from it (right click on the component and Remove Component). Now click the Play button and I believe you can fly (and touch the sky)!
Nav Mesh Agent
This one uses a component called Nav Mesh Agent that can use paths to move the player around. When you press and release the trigger the Player will move automatically to the point you were looking at. It will take the shortest path and avoid obstacles, which means that the trajectory will not be a straight line if there are obstacles on the way. The advantage is that users can look around when moving toward their goal, the disadvantage is that they don’t have direct control over the trajectory (because of the obstacle avoidance) which can cause cybersickness (I will cover cybersickness, how it can occur and how it can be prevented/reduced, in an other section).
For this one create a new scene with the name you like (go into your Scenes folder, right click and Create > Scene). Copy all the game objects in your current hierarchy (select all, right click and Copy), go to your new scene, delete all auto-generated game objects from the hierarchy and paste the one you copied (right click and Paste). Remove the Rigidbody and PlayerMotorDrag components from the Player. Still in the Player click Add Component and type and select “nav mesh agent”.
You can see that the Nav Mesh Agent has some cool parameters like speed, acceleration… that allow to customize the way your Player move around. But before we can move we need to define where the Player is allowed to move. To do that we will bake a Nav Mesh. “Bake” and “Baking” is used in Unity to refer to computation technics that are done before the game is launched. The result is then saved to a file and can be accessed directly when the game is running without the need to compute all over again. Its a trade off between computation at runtime and size of your final game file. In the case of VR, computation time is very critical, and baking data (like lights that I will cover in an other section) is often necessary.
Unity has a good article about Building a NavMesh. Basically, what you have to do is select in the hierarchy the elements that take part in the navigation (floor, stairs, obstacles…). Then in the Inspector click the small arrow near Static in the top right corner and select Navigation Static.
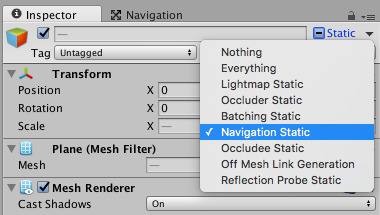
In our case the relevant game objects for navigation are the Plane and the Cube, so select them both and mark them as Navigation Static. Then open the Navigation window (Window > Navigation). Here in the Bake tab you have several parameters that influence where your Player can go (as described in Unity Building a NavMesh manual page). Leave them as they are and hit the Bake button at the bottom left corner. Unity will do its magic and you should see the walkable area in blue in your scene.
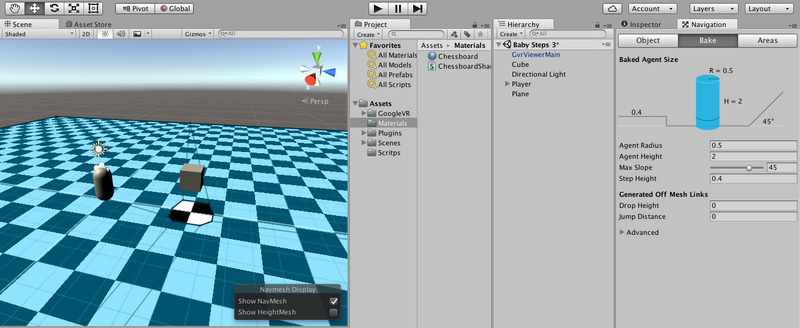
Here you can see that the area under the cube is not walkable. That’s because the Player is too tall to go under it. Let’s add an other obstacle! Create a new cube and call it “Wall”, set its Position to (0, 0.5, 2) and Scale to (8, 1, 1). Set it as Navigation Static and in the Navigation window hit bake again (you need to rebake every time you add a new obstacle).
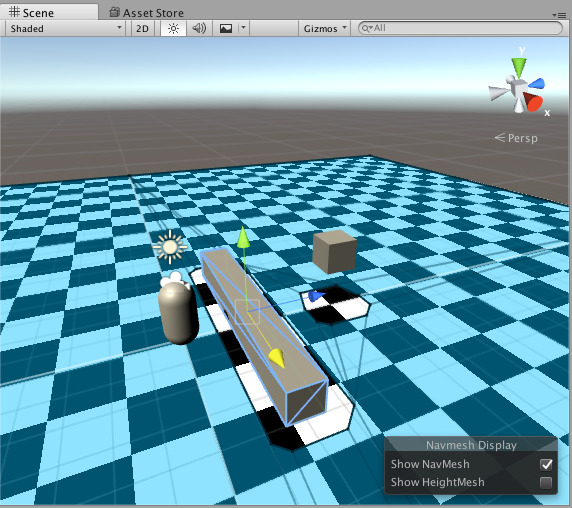
Now we can add the logic to the Player. Create a new script called “PlayerMotorNavMeshAgent” and copy-paste the following code into it:
using UnityEngine;

[RequireComponent(typeof(NavMeshAgent))]
public class PlayerMotorNavMeshAgent : MonoBehaviour
{
    /*
     * Use the reticle to move toward the gazed object (when trigger is pressed once).
     * Uses a NavMeshAgent, so the player will move following the shortest available path to the destination.
     * A nav mesh must be baked.
     */

    private NavMeshAgent agent;

    void Awake()
    {
        this.agent = GetComponent<NavMeshAgent>();
        agent.updateRotation = false;
    }

    void Update()
    {
        if (Input.GetButtonDown("Fire1"))
        {
            Vector3 destination;
            if (FindDestination(out destination))
            {
                agent.destination = destination;
            }
        }
    }

    private bool FindDestination(out Vector3 destination)
    {
        Transform camTransform = Camera.main.transform;
        RaycastHit hit;
        Ray ray = new Ray(camTransform.position, camTransform.forward);
        bool success = Physics.Raycast(ray, out hit, Camera.main.farClipPlane, -1);

        if (success)
        {
            destination = camTransform.position + camTransform.forward * hit.distance;
        }
        else
        {
            destination = Vector3.zero;
        }
        return success;
    }
}
The key parts are:
agent.updateRotation = false;=> We don’t want the Nav Mesh Agent to rotate the Player because it would also rotate the camera.new Ray(Camera.main.transform.position, Camera.main.transform.forward);=> Create a Ray to where the camera is facing.Physics.Raycast(...)=> Check if the Ray hit an object and if yes save the hit information to a RaycastHit.
Note: Physics.Raycast can only hit game objects with a Collider. If the game object doesn’t have one the ray will just pass through.
Drag and drop this script to your Player and you are good to go! Hit Play and test by clicking just behind the Wall, your Player should start moving around it and stop where you clicked.
Chessboard material for tests
This material is very useful when you want to do tests.
First create a folder called “Materials” in your Assets folder, then right click on the folder and select Create > Material, call it Chessboard (or whatever you like). Now create a new Shader (Create > Shader > Unlit Shader) and open it with a double click. Replace the existing code with this one:
Shader "Custom/ChessboardShader" {
    Properties
    {
        _Density ("Density", Range(2,50)) = 30
    }
    SubShader
    {
        Pass
        {
            CGPROGRAM
            #pragma vertex vert
            #pragma fragment frag

            struct v2f
            {
                float2 uv : TEXCOORD0;
                float4 vertex : SV_POSITION;
            };

            float _Density;

            v2f vert (float4 pos : POSITION, float2 uv : TEXCOORD0)
            {
                v2f o;
                o.vertex = mul(UNITY_MATRIX_MVP, pos);
                o.uv = uv * _Density;
                return o;
            }

            fixed4 frag (v2f i) : SV_Target
            {
                float2 c = i.uv;
                c = floor(c) / 2;
                float checker = frac(c.x + c.y) * 2;
                return checker;
            }
            ENDCG
        }
    }
}
I will not explain how this code works as shaders are rather difficult to understand, and out of the scope of this tutorial. But if you are interested (and I found it very interesting) you can read more about what shaders do and how they work here (that’s where I got this piece of code).
Now drag and drop your shader on your material, then drag your material on the Plane.
