Although, a fast-moving early stage startups and a fully grown company often have totally different speed and structure, there are common software solutions and practices that can be beneficial to project maintainability in both cases. Using multiple environments is one of these solutions.
Using multiple environments is a common practice used in mobile applications. Android and iOS do have a lot of tools to let developers switch easily between environments or app configurations.
Flutter adopted the android flavors. Quoting a comment from a “github issue”: “The flavor option maps directly to an Android product flavor and loosely to an Xcode scheme”.
This reflects the fact that implementing flavors in flutter is almost straightforward. In iOS supporting multiple environments with schemes still requires a bit of digging. If you want to avoid looking around for the different pieces of the puzzle this blog is a quick summary of what you need to do to seamlessly switch environment and build configuration in a flutter project.
Starting point
This post assumes that you are familiar with firebase setup for flutter projects. If you are not, follow the “getting started guide”.
We’ll be using 2 different firebase projects, one for development and one for production. Basically we have two different versions of our app.
Our goal is to seamlessly switch between two different firebase instances. We also want to be able to build the app with different configurations. In practice we have 4 permutation:
- debug configuration with firebase dev environment
- prod configuration with firebase dev environment
- debug configuration with firebase live environment
- prod configuration with firebase live environment
Android
If you are not familiar with android build types, product flavors and build variants this is what you need to know:
Build types: a build type defines a set of properties that are used to configure your application to better serve a stage of the development lifecycle (development, testing, staging, production…).
Product flavors: a flavor is a different version of the app, like free and paid.
Build variants: a build variant is the cross product of flavors and types.
NOTE: It may be a bit misleading to use firebase instances identified as dev and live environment but in our case are two separate instances of the backend.
Now that you master the concepts in android, these are the steps to implement the android part:
Step 1
As first step we need to create 2 android flavors, dev and prod in gradle. To do that add, this to your app’s gradle file right after buildTypes, inside the android node:
flavorDimensions "default"
productFlavors {
    dev {
        dimension "default"
        applicationIdSuffix ".dev"
    }
    prod {
        dimension "default"
    }
}
The applicationIdSuffix generates a different package identifier.
Step 2
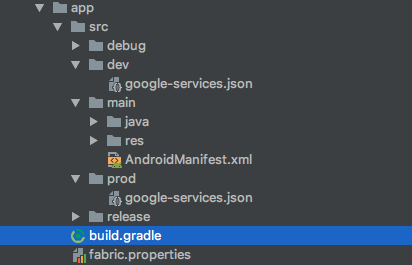
Create 2 directories, named as the flavors, under src folder and place different google-services.json files in them:

Step 3 (Optional)
Create 2 directories, one for each buildType and put there the google-services.json. In this way, the configuration can be be used for Debug or Release when no flavor is passed. This can be used to set a default for the release.
The Android part is done, now let’s have a look at iOS.
iOS
This part requires a bit more effort. I’m sure you are not shocked, we are using Xcode after all! Xcode uses schemes. Basic concepts on iOS side are build configurations, targets and schemes.
Build configurations: it maps almost directly to build types in Android. They consist of a set of properties that are typically changing with the development cycle. Xcode provides two standard project-level build configurations: debug and release. Targets: A target specifies a product to build. Schemes: A scheme is a set of targets. A scheme defines which targets are used in response to Xcode actions such as Run, Test, Profile
In our case we want to create dev and prod schemes. And for each scheme we need the Debug and Release build configuration.
Step 1
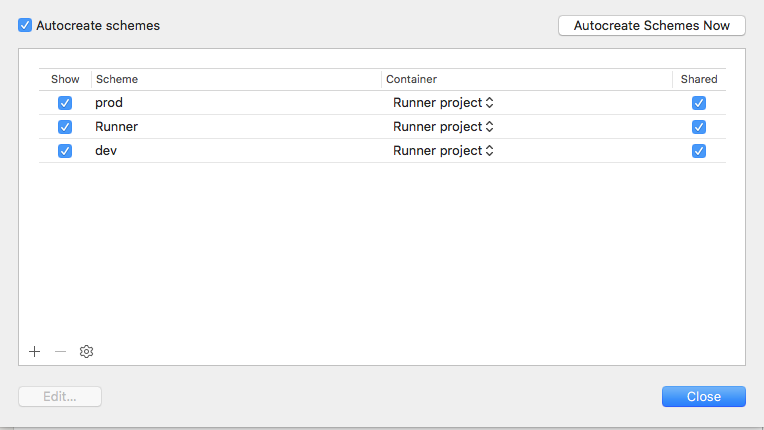
Create 2 schemes dev and prod with Xcode:
- From the top menu select Product -> Scheme -> Edit Scheme
- Duplicate the base scheme and name it accordingly to the flutter flavor. Even if it is not strictly required, you should use the flavor name for consistency.
- Check the Shared option in the schemes management tool and ensure that it looks like this:

Step 2
For every scheme create a new build configuration combined with each different build type (Debug, Release).
- Select the Runner
- Open the Info tab
- In the configurations section create any combination of buildType and scheme (default config Debug and Release will already be there)
- In the end the configurations should look like this:

Step 3
Create a firebase directory under the Runner and two other directories (Prod and Dev). Finally, place the different plist file in them.
Note: You can put the plist files in other places, If you do that make sure to customise the script in step 4 accordingly.
Step 4
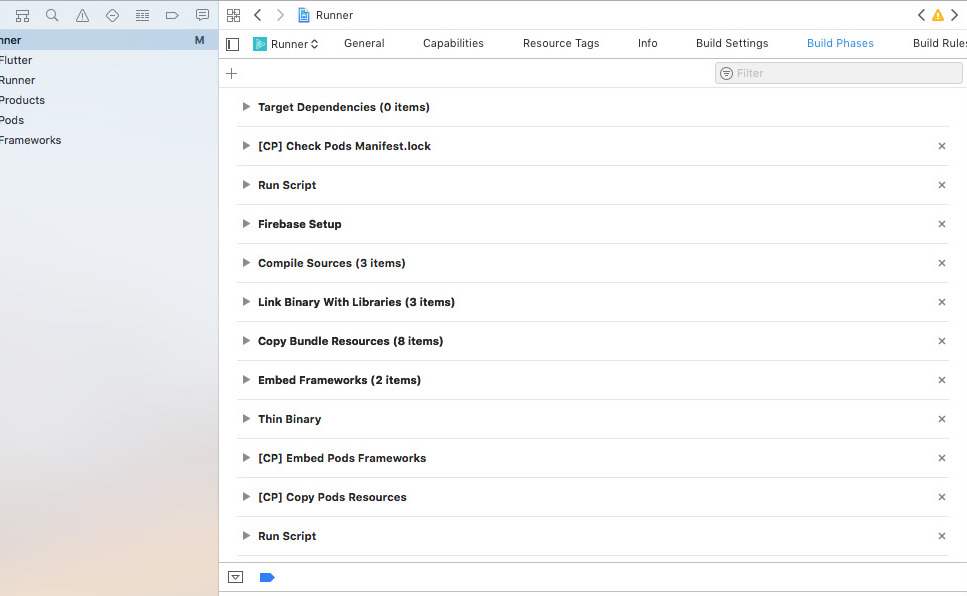
Add a custom script to build phases:
- Now select the target in the project editor view and select the Build Phases tab
- A new run script phase. Use a naming convention that is easy to remember (i.e. Firebase Setup), and move it above Compile Sources

- We need a script to copy the correct file in the Runner directory at runtime. To do that, use this code:
if [ "${CONFIGURATION}" == "Debug-prod" ] || [ "${CONFIGURATION}" == "Release-prod" ] || [ "${CONFIGURATION}" == "Release" ]; then
cp -r "${PROJECT_DIR}/Runner/Firebase/Prod/GoogleService-Info.plist" "${PROJECT_DIR}/Runner/GoogleService-Info.plist"

echo "Production plist copied"

elif [ "${CONFIGURATION}" == "Debug-dev" ] || [ "${CONFIGURATION}" == "Release-dev" ] || [ "${CONFIGURATION}" == "Debug" ]; then

cp -r "${PROJECT_DIR}/Runner/Firebase/Dev/GoogleService-Info.plist" "${PROJECT_DIR}/Runner/GoogleService-Info.plist"

echo "Development plist copied"
fi
The script uses the dev environment, as default for debug builds. For release, instead, the default will be the prod environment.
Back to flutter
In flutter everything will work seamlessly. The only thing you need to do is to specify which flavor to use when running and building. You can do that from command-line tools by using —flavor** [flavor-name] (i.e flutter run —flavor dev). The flavor is independent from the build type so you can have both flavors for either Debug or Release builds. If you’re using Android Studio or any other IDE you can create 2 run configurations with different flavors and use them to run your app.
Now you can spend more time coding and less time in looking over different builds.
